1.1. Checking for NDCI Support Software or Getting Name
When trying to determine if NDCI's Instant Support software is installed, or what the name of your computer is please do the following:
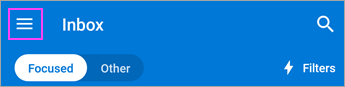
Go to your Start Bar and look for the Clock, You'll look to see if the Icon like the below is present:
If it is present you should be able to simply provide us the name of your computer by hovering your mouse over the Icon. You may need to click on the Up Chevron or Left Chevron to show the icon.
If the Icon is not present Please follow these steps to install our Instant Support Software
4. Run that software and once installed you should have our Instant support software visible in the start bar,
5. Please reply back to this ticket once that has been completed.
6. Once the software is installed you should see the Above Icon and be able to provide us the name of your workstation
2. Sophos
2.1. Sophos UTM SSL VPN
See the attached file for Instructions on how to configure your VPN Client.
In most cases you will use your windows username/password. Unless otherwise specified
2.2. Sophos XG VPN Firewall Client Install
Configuring SSL VPN client
Downloading the SSL VPN client software
From a browser, logon to the user portal using the Sophos Firewall's public IP address and the user portal https port as provided by the support technician working with you
Once logged into the portal, download the Sophos Connect client for the required endpoint accordingly.
Also Download the SSL VPN Configuration file for your Operating System
Now Run and Install the Sophos Connect Client.
Start the Sophos Connect Client when prompted
Once it has completed installing Run the SSL VPN Configuration file you downloaded (This will automatically import the configuration file)
Connecting
Follow these instructions to establish a connection.
Make sure there's at least one imported connection available, and your firewall administrator has given you the required credentials.
To establish a connection do as follows:
Select a connection on the Connections page.
Double-click the connection.
You can also click Connect.
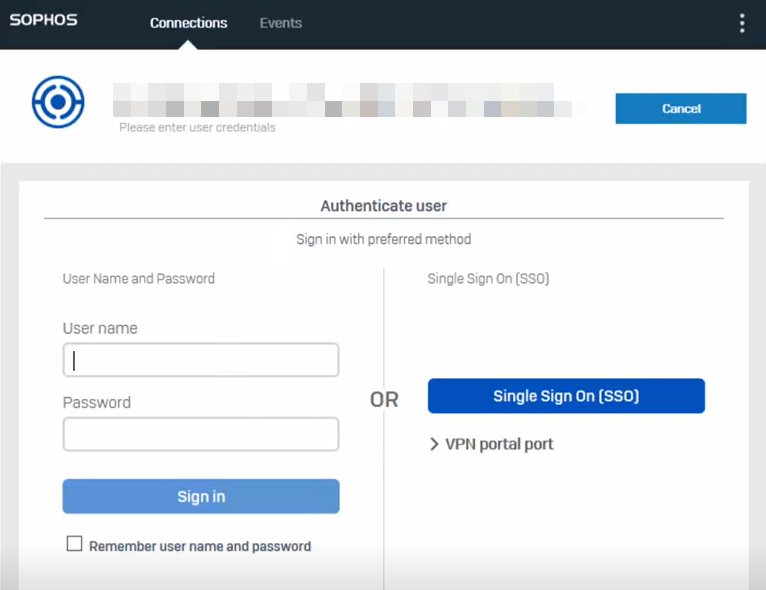
The sign-in screen appears. The following image shows the sign-in screen:
Enter your username and password and click Sign in. Your firewall administrator may have configured one of the following types of multi-factor authentication:
If your firewall administrator has configured One Time Password (OTP), in addition to entering your username and password, you must enter your six-digit OTP passcode. You'll see a third input box (under username and password) where you enter the OTP passcode.
If your firewall administrator has configured DUO authentication, you may get one or two DUO prompts during the connection process.
If your firewall administrator has configured mixed mode two-factor authentication (2FA), you'll see a third input box (under username and password). You must enter one of the following words: push, phone, sms, or enter a DUO token.
If you aren't sure about which options you can choose, contact your IT administrator or firewall administrator.
Note
If you imported the connection using a provisioning file, you'll get a warning that the server certificate can't be verified. You can click OK to continue. If you don't want to see the message, contact your firewall administrator.
Sophos Connect attempts to establish the connection and authenticate you.
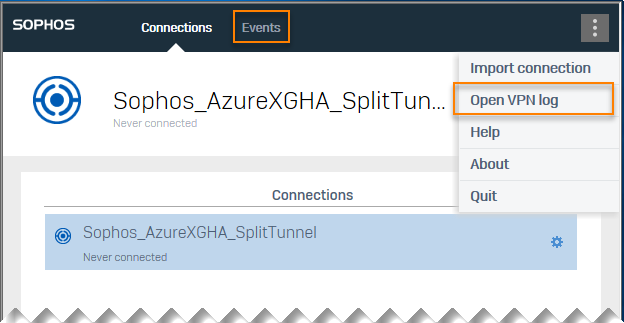
If you're facing connection issues, do as follows:
To investigate the cause, click the Events tab or click the menu icon and select Open VPN log.
You can also contact your IT administrator or firewall administrator for further assistance. The image below shows you where to find the Events tab and Open VPN log.
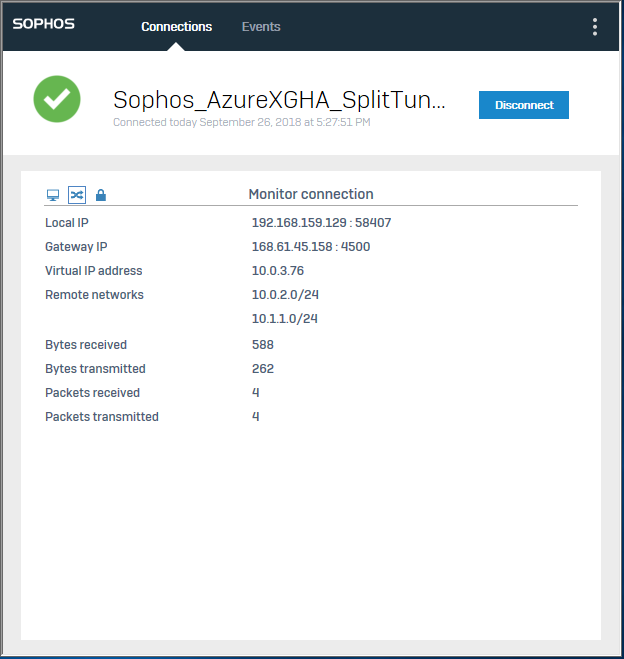
The connection to the remote server is established. The image below shows a successful connection:
If the connection is successful, you'll see this icon on the taskbar:
If the connection is unsuccessful, you'll see this icon on the taskbar:
Note
If you've renamed the connection, the original name, as provided by your firewall administrator, still shows in connection details. For instructions on how to rename it, see Connection options.
3. Windows
3.1. How to Use Problem Step Recorder
Taken from: http://windows.microsoft.com/en-us/windows7/how-do-i-use-problem-steps-recorder
You can use Problem Steps Recorder to automatically capture the steps you take on a computer, including a text description of where you clicked and a picture of the screen during each click (called a screen shot). Once you capture these steps, you can save them to a file that can be used by a support professional or someone else helping you with a computer problem.
Notes
When you record steps on your computer, anything you type will not be recorded. If what you type is an important part of recreating the problem you're trying to solve, use the comment feature described below to highlight where the problem is occurring.
Some programs, like a full-screen game, might not be captured accurately or might not provide useful details to a support professional.
Open Problem Steps Recorder by clicking the Start button , and then typing psr. In the list of results, click psr.
Click Start Record. On your computer, go through the steps on your computer to reproduce the problem. You can pause the recording at any time, and then resume it later.
Click Stop Record.
In the Save As dialog box, type a name for the file, and then click Save (the file is saved with the .zip file name extension).
To view the record of the steps you recorded, open the .zip file you just saved, and then double-click the file. The document will open in your browser.
After recording and saving a .zip file, click the help down arrow , and then click Send to E‑mail recipient. This will open an e‑mail message in your default e‑mail program with the last recorded file attached to it. Please be sure to copy the subject of your existing support ticket and use it if you are sending this to us via Support@northerndatacomm.com
Note
You won't be able to click the Send to e‑mail recipient option until you've recorded and saved a file.
This video demonstrates how to configure Outlook 2003, 2007 and 2010 for RPC-over-HTTP. Originally intended for Infinitely Virtual clients, this video will be of assistance for anyone looking to understand the procedure. In this video we will learn how to configure Outlook for RPC over HTTP, but please be aware that RPC over HTTP only works in Outlook 2003 or later. This video describes the generic process for configuring Outlook to use RPC over HTTP to access an exchange email server. For the specific configuration settings for your exchange email server, contact your exchange server administrator.
Ad
Steps
1
Go to the Control Panel and open 'Mail.'
Ad
2
Click on the 'Email Accounts' button.
3
Click 'New' on the 'Email' tab.
4
Select 'Manual Configure Server Settings' or 'Additional Server Types' and click 'Next.'
5
Select 'Microsoft Exchange' and click 'Next.'
6
Type in the name of your exchange server in the Microsoft Exchange Server field.
7
Make sure the 'Used Cache' exchange mode option is selected and click on 'More Settings.'
8
Click on the 'Connection' tab, check the 'Connect to my exchange mailbox using HTTP' option and click on 'Exchange Proxy Settings.'
9
Fill in the URL for the proxy server for exchange.
10
Make sure the 'Connect using SSL only on fast networks and on slow networks' options are checked.
11
Select 'Basic authentication' for the proxy authentication settings and click on 'OK.'
12
Click on 'OK.'
13
Click on 'Check Name.'
14
Type in your user name and password and click 'OK.'
15
After the exchange server validates your login credentials, both the Microsoft exchange server and username fields will be underlined. On the following screens click 'Next,' 'Finish,' and 'Close,' and you are done.
4.2. Adding Another Users Folder to your Outlook 2013 account
Taken from: http://support.sherweb.com/Faqs/Show/how-to-add-another-persons-mailbox-to-your-outlook-2013-profile-exchange-2013
How to add another person's mailbox to your Outlook 2013 profile (Exchange 2013)
Synopsis
This guide will show you how to add another person's mailbox to your Outlook 2013 profile.
3. Under the Info header, click on the Account Settings button and then on the Account Settings in the list.
4. In the E-mail tab, make sure your account is selected, then click on Change.
5. Click the More Settings button.
6. Click on the Advanced tab and then click on Add.
7. Enter the email address of the delegated mailbox in the Add mailbox field. Then click on OK.
8. Click on Apply and then on OK. Outlook will now be busy accessing the other mailbox's data, so this may take a while.
9. Back in the Change Account window, click on Next and then on Finish.
10. Close the Account Settings window. You should now see both mailboxes in your Outlook profile.
If you need further assistance, please do not hesitate to contact us.
Keywords
add, open mailbox, profile, delegate, Outlook 2013
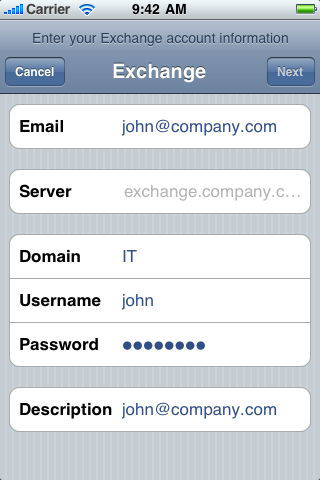
4.3. IPhone Exchange Setup
iOS: Setting up Exchange ActiveSync
This article explains how to setup an Exchange ActiveSync account on your iPhone, iPad or iPod touch. Contact your Exchange Server administrator if you are unsure of any of the required information.
Follow these steps to setup your Exchange ActiveSync account your iOS device:
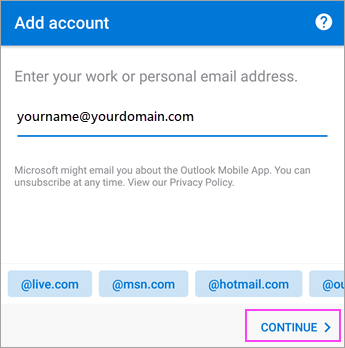
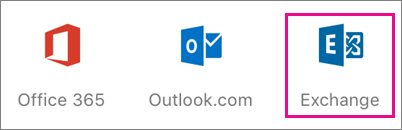
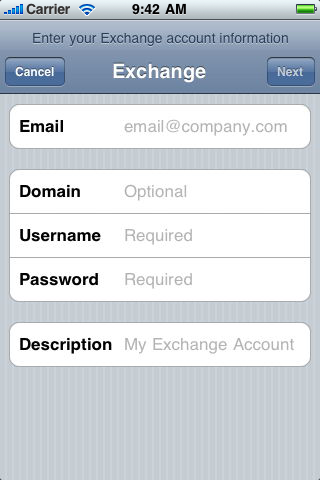
Tap Settings > Mail > Add Account > Microsoft Exchange.
Enter the information in the fields below, then hit Next:
Your iOS device will now try to locate your Exchange Server. If necessary, you will need to enter your front-end Exchange Server's complete address in the Server field.
You can often leave domain empty. Your username will be the same as what you login to the Webmail or your workstation. IE Email maybe john@company.com but your username maybe johnwatts or jwatts.
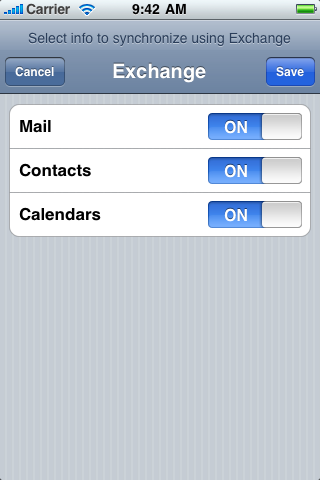
Choose which content you would like to synchronize: Mail, Contacts, and Calendars. Tap Save when finished.
Note: To modify your exchange settings, Tap Settings > Mail, Contacts, Calendars, select your Exchange account, and tap Account Info.
Sourced from http://support.apple.com/kb/ht2480
4.4. Android Exchange Setup
Set up Microsoft Exchange email on an Android
From the Applications menu, select Email. This application may be named Mail on some versions of Android.
Type your full email address, for example tony@contoso.com, and your password, and then select Next.
Select Exchange account. This option may be named Exchange ActiveSync on some versions of Android.
Enter the following account information and select Next.
Domain\Username Type your full email address in this box. If Domain and Username are separate text boxes in your version of Android, leave the Domain box empty and type your full email address in the Username box.
Note On some versions of Android, you must use the domain\username format. For example, if your email address is tony@contoso.com, type contoso.com\tony@contoso.com. Your username is your full email address.
Password Use the password that you use to access your account.
Exchange Server Use the address of your Exchange server. If you're connecting to your Office 365 email, use outlook.office365.com for your server name. If you are not using Office 365, see Find your ActiveSync server name later in this article.
As soon as your phone verifies the server settings, the Account Options screen displays. The options available depend on the version of Android on your device. The options may include the following:
Email checking frequency The default value is Automatic (push). When you select this option, email messages will be sent to your phone as they arrive. We recommend only selecting this option if you have an unlimited data plan.
Amount to synchronize This is the amount of mail you want to keep on your mobile phone. You can choose from several length options, including One day, Three days, and One week.
Notify me when email arrives If you select this option, your mobile phone will notify you when you receive a new email message.
Sync contacts from this account If you select this option, your contacts will be synchronized between your phone and your account.
Select Next and then type a name for this account and the name you want displayed when you send e-mail to others. Select Done to complete the email setup and start using your account.
Note You may need to wait ten-to-fifteen minutes after you set up your account before you can send or receive e-mail.
4.5. Android Outlook Setup
If you haven't already, install the Outlook for Android app from the Google Play Store or click here to enter your phone number and receive a download link.
Open Outlook for Android. If this is the first time, tap Get Started and Skip if you're prompted to add any detected accounts. Otherwise, open the Menu > Settings > Add Account > Add Email Account
Enter your company email address, then tap Continue.
Tap Exchange.
Enter your company email address and password to automatically configure your account. Tap Sign In.
Notes: If automatic configuration fails, tap Continue, then enter the following settings manually:
Server name: This is usually the same name you enter when checking your email on the web.
Domain: This is usually optional. If unsure, check with your IT administrator.
Username: This is your company email address.
Password: This is the password for your company email account.
Tap Next when finished and swipe through the features.
You're now ready to start using Outlook for Android! Get the most out of Outlook:
How to Add a Room List to Outlook Calendar: A Step-by-Step Guide
Add a Room List to your Outlook Calendar
How many times have you been to a training or conference room and found out it’s booked?
Well if you’re wondering how to add a room list to your Outlook calendar, we’ve created an easy step-by-step guide.
How to add a room list to Outlook Calendar:
Open Outlook Calendar
a. Look for the ‘+Add’ button on the top menu
b.Or Right Click on My Calendars on the left bar and Choose +Add Calendar
In the drop down menu, click ‘From a room list’
In the pop up, select the room calendar you’d like to view
Double click the room and press ok
The calendar will appear on the right hand side of your screen
If you’re more of a visual learner, check out our step-by-step guide below:
Open Outlook Calendar. You can find this on the left hand side of the menu, highlighted in red on the image below.
Step 1: Open Outlook Calendar to begin adding a room list.
a. On the top menu, look for the ‘+Add’ button or See step 2b if you can't find this button
Step 2: Look for the ‘+Add’ Button on Outlook Calendar
2b. or Right Click My Calendars and Choose Add Calendar:
From the drop-down menu, select ‘From Room List’.
Step 3: Select ‘from room list’ in the drop-down menu
A list of rooms that can be added to your Outlook Calendar will be listed here.
Step 4: Select the room list you’d like to add to your Outlook Calendar
Double click the room calendar you’d like to open and press ok.
Step 5: Double click the room list you’d like to open and press ok to open up the Outlook Calendar
On the right hand side of your screen, you’ll see the room has been added to your calendar.
But how can you remove it?
On the left hand side of your screen, you can deselect the room. In this example, I would deselect ‘Training Room’.
Step 6: Hide the room list by unticking the box on the left hand side of the Outlook Calendar
You’ve now added a room to your Outlook Calendar, and learnt how to hide the calendar when it’s no longer required.
Step 7: Complete – You’ve now added a room list to your Outlook Calendar
4.7. Sending as Another User
Sending On Behalf of another user
To send a message on behalf of a different user:
Open a new email and go to Options. Click From to show the From field:
Click From > Other E-mail address. Type in the address of the user or select it from the address book and click OK:
Send the message. It will show Your Name on behalf of Other User Name:
Note: by default, messages sent on behalf of another user resides only at delegates Sent Items folder. If your Account is on Exchange Server 2016 or newer, messages can be copied to the Sent Items folder of the originating mailbox (on behalf of) which the message was sent. Contact Support to enable this feature.
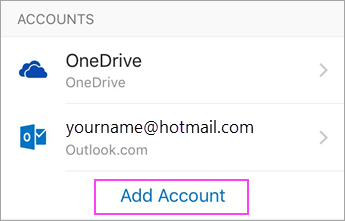
Open Settings and choose Mail, Contacts, Calendars from the list.
2
Under "Accounts", click "Add Account"
3
Click on the "Gmail" icon.
4
Fill in the requested information. Email and password are required. User your Company Email address for Username and Email
5
Select which Gmail functions you want available on your phone--you can sync Mail, Contacts, Calendars, and Notes from your Google account into your phone. We recommend only Syncing Mail.
6
Click "Save" on the top right hand corner.
7
Go to the Home menu and click on the Mail icon to view your mail.
6. Dell
6.1. Transferring Ownership
Any computer purchased by NDCI should be transfered to your company upon final payment. You can transfer your computer to your company by using the following link:


 , and then typing
  , and then click


 > Settings
  > Add Account > Add Email Account